|
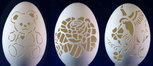
In Ming (1368-1644) and Qing (1644-1911) dynasties in China, people had the custom of presenting red eggs as a gift on weddings, birthday parties and child birth celebrations. At that time it prevailed even more in Beijing area with a considerable amount of egg consumption. Thus some people worked on the business of dyed red egg which is called the "color egg". Later, traders painted patterns on these eggs such as flowers and birds, fishes and insects and facial make-up for better sales. After years of evolution, the egg craft gradually improves. Nowadays, people may hollow the egg and carve exquisite patterns on the shell surface which finally forms a precious art with high appreciation value - eggshell carving. Eggshell carving has a variety of crafts. One kind is to carve such patterns as figures, landscapes, birds and flowers on dark egg shell using burin with the formed patterns similar to the sketch or outline drawing; the other kind is to carve on thick duck or ostrich eggs with the method of bas-relief or hollow-out. The process of removal of egg liquid, disinfection and so on needs to be done after completing the eggshell carving. Due to fragileness, it is very difficult to carve on avian eggshell; hence eggshell carving products are not common in market. Egg art is one of the earliest forms of art. There is something fascinating about the shape of the egg, and the idea of making this into art. Many early civilizations regarded the egg as a fertility symbol and decorated it as part of their fertility rites. But modern man still values egg art, possibly because it has become ingrained in our nature, or because we are amazed that art can be made from something as fragile as an empty eggshell. Whatever the reason, there are many artists throughout the world that paint, decorate, and even carve shapes into eggshells. 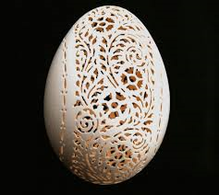
|
You will need:
Dremel MultiTool - any model that accepts flexible shaft attachment Dremel flexible shaft attachment #108 engraving cutter Eggshells 3B pencil Here's how: 1. Before you start carving your eggs you will need to blow out the inside. To do this you will need to drill a hole in the base of the egg with your Dremel MultiTool and a small drill bit. Hold the egg in the palm of your hand and wrap your fingers gently around to nestle the egg while you drill a hole in the base and then in the top. Use a straightened paper clip and insert this into the hole to loosen the yolk and egg white to make it easier to blow out. 2. Draw your design gently onto the egg shell with a 3B pencil. Start off with a simple design until you get the hang of using the engraving tool and work up to more intricate designs as you become more experienced. 3. Using the flexible shaft attachment and #108 engraving cutter, gently apply the tip of the cutter to the surface of the eggshell to remove detailed areas. Only a very light touch is required - too much pressure and you will damage the surrounding area. DIY Tip: Always have the egg nestled between your thumb and index finger whilst carving, and move the egg around as you carve out the design. |
|
|